Chatting with Barbara Ashton this morning, she mentioned that she had received her order from The Parsley Box. Ready meals which you just put in the microwave! She was very impressed with the ones she had tried - and you know that she used to be a Home Economics teacher, so she knows what she is talking about! Might be worth a try, if you are looking for a change from your normal routine!
https://www.parsleybox.com/
Tuesday, 31 March 2020
Monday, 30 March 2020
More fabulous crafting by Beryl

Would you look at these! Wow! The roses are made of paper and the others made of parchment.
Just amazing!
We won’t be short of ideas for our Tuesday craft afternoons when we get back together!

These are so delicate!

Saturday, 28 March 2020
More wild flowers to test your knowledge!
This afternoon I walked a little way along the coast path from Gillard Road towards Berry Head. This is what I saw: Does this one count as a ‘flower’? I decided to include it anyway!


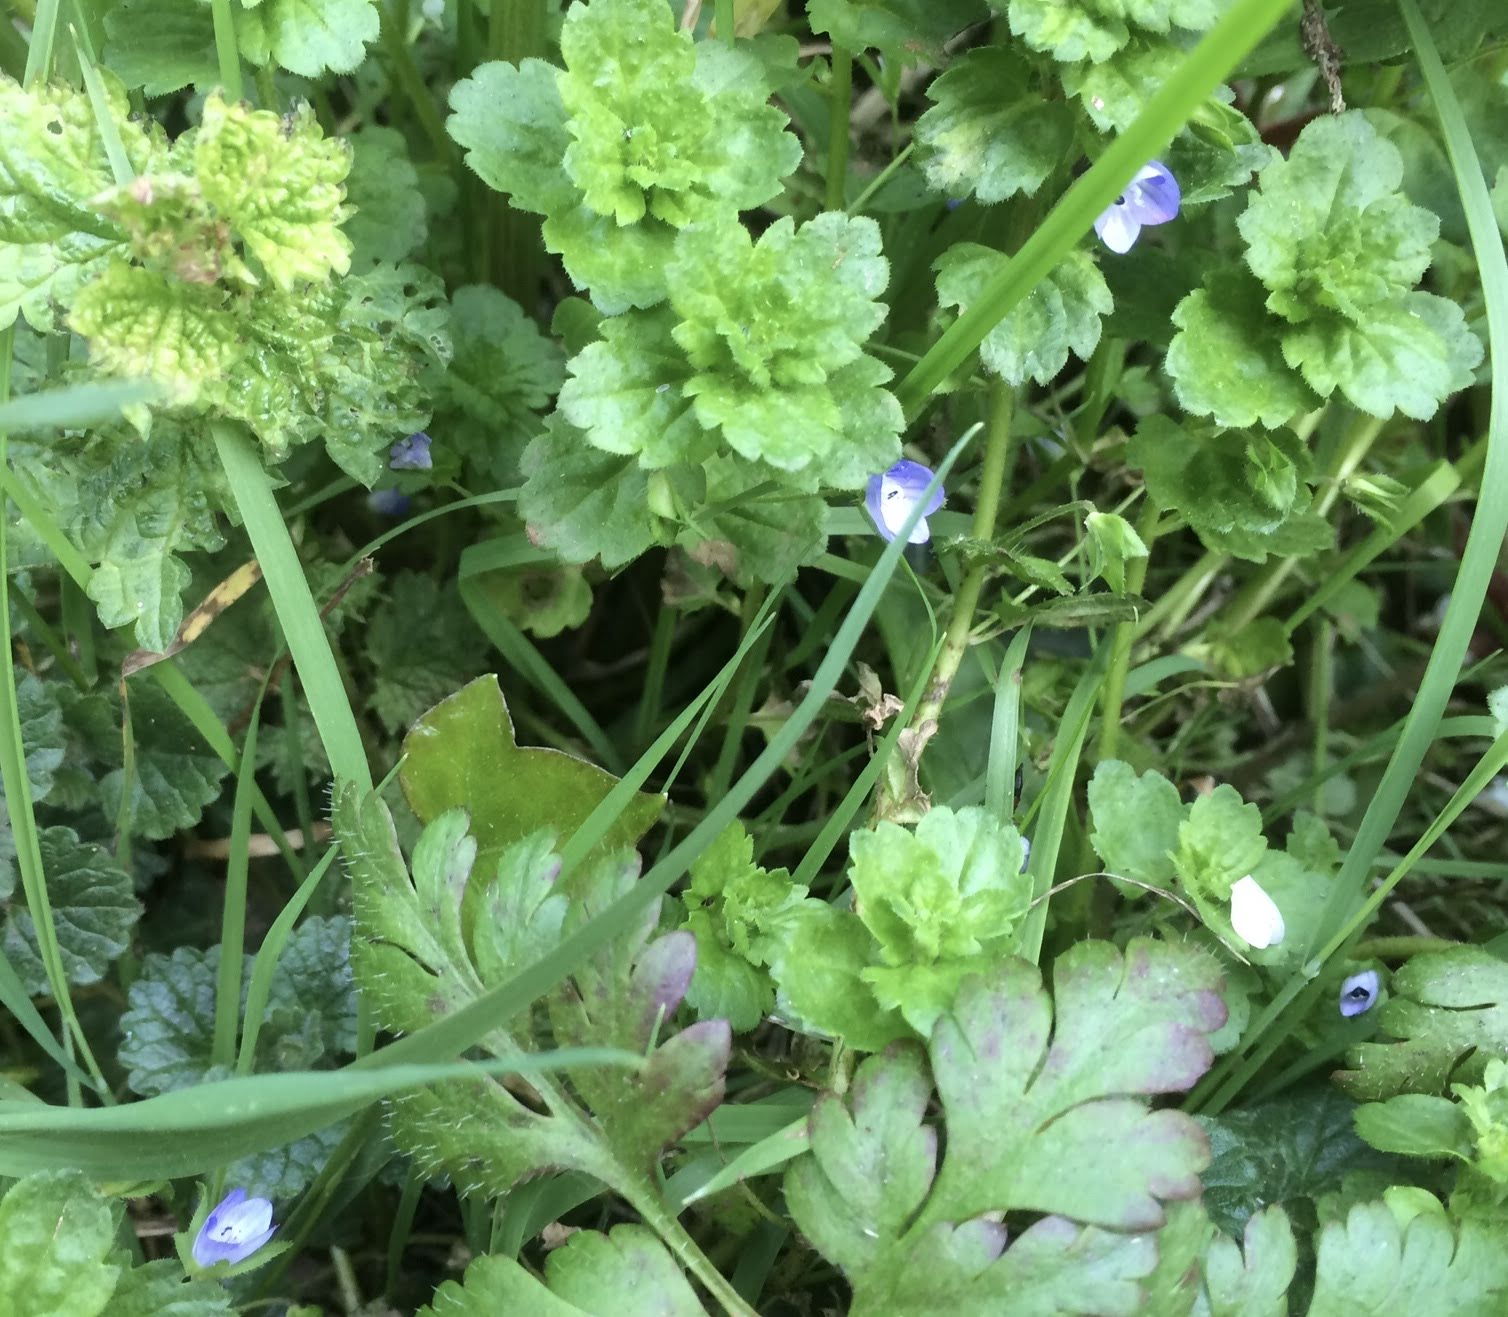


Email me your answers, please! I know one person who will know every one of them!
Barbara’s challenge!
Do you recognise these plants? Some call them weeds, most of us prefer to see them in the wild. Whichever it is, they are very pretty! Answers on a postcard please - or email will do!
What is the prize? Undecided as yet! Possibly a virtual something!


What is the prize? Undecided as yet! Possibly a virtual something!

This from Mary W. Thank you for setting this off, Mary!

These two are from Barbara.

I’m adding this one from my garden because although it is the same plant as the one above, the flowers are a different colour. This could be because Barbara took her photo in direct sunlight? Or simply a variation?

Through the Looking Glass
This time at home could be an excellent opportunity for each of us to create something for our November craft challenge! (Thank you Tina for thinking of it!)
The idea is to create - using any medium you prefer - something which you feel represents:
The idea is to create - using any medium you prefer - something which you feel represents:
Through the Looking Glass
I guess if you are planning to bake your entry, you could do it now and freeze it....? Or if you are thinking along the lines of dramatic art or a modern contemporary dance display, then you will simply be rehearsing for the big day....
Are you thinking Alice in Wonderland? The wicked Queen from Snow White? The Mirror of Erised from Harry Potter? Justin Timberlake’s song? The Beast’s mirror from Beauty and the Beast? The mirror from The Lady of Shalott? The mirror of Galadriel from the Lord of the Rings? The Snow Queen, Hans Christian Anderson? Or perhaps you can come up with some other ideas?
Wednesday, 25 March 2020
Running short of sewing and knitting supplies?
For those blog readers in Brixham, great news!


Sandy, at the Sewing Box, posted this useful information yesterday!
How to make a little gift box
How to make a little gift box.
Two squares of paper
Scissors
Glue if required
- Find the centre of the square, by folding diagonally, one corner across to the opposite one, crease and then open out. Repeat on the opposite corners. You should have the middle of your paper where the creases cross.
- Fold a corner into the centre x make a crease along that fold.
Fold your newly creased edge in to the centre x and make another crease along that fold.
- Repeat number 2 on the opposite side.
- Open it all out flat again.
- Repeat number 2 on one of the corners as yet unfolded.
- Repeat number 2 on the last unfolded corner.
- Open it all out flat. Place your paper flat on the table so that one corner is in front of you. You will see a grid of folds at right angles to each other on the paper. From the corner nearest to you, move your finger to the first fold which runs from left to right, and slide your finger to the right edge where it meets the next fold, which is at 90 degrees to the first fold.
- Make a cut along this fold, only up to the next fold line.
- Make a similar cut along the corresponding fold on the left side.
- Turn the paper around so that the opposite corner is facing you.
- Repeat steps 7, 8 and 9.
- Turn the paper so that an uncut corner is facing you. Fold the corner over twice, towards the centre, using the fold lines you have already made. Make each end turn the corner to build the sides of your box.
- Repeat step 12 with the other side.
- Lift the other corners and make them sit on the bottom of your box. If you add a spot of glue, the box will be firmer; it still works without it.
For the lid of the box follow the same process - but! At step 2, instead of folding the points right up to the centre x, leave a little space - 1 or 2mm, so the points don’t quite meet. Then the top will be slightly larger than the base.
Tuesday, 24 March 2020
Virtual social and craft afternoon
Beryl has kindly made these for us. I can almost smell them...... they look sooo good!


I asked if she would send some by post - I think the postman might have snaffled them before reaching my letterbox. Who can blame him?
More crafting activity flooding in now!
Mary has another great grandchild on the way...and is preparing a very warm welcome! (Do you see what I did there? 😂)


Aren’t they beautiful? I have it on good authority that bootees are in the pipeline.....
Barbara, meanwhile, has been working on some spectacular cards:

Perhaps we can look forward to some rather brilliant workshops together?
Finding what you are looking for..
...is very easy on this blog!
Scroll down the page and look at the right column, underneath the Programme. The title of each of the articles posted this month appears there, so you can easily choose which one to view.
Scroll down the page and look at the right column, underneath the Programme. The title of each of the articles posted this month appears there, so you can easily choose which one to view.
Monday, 23 March 2020
Patchwork Post - small cushion 4
Now it’s time to make the other side of the cushion cover, building on the techniques already learned.


 Be very careful to cut each strip accurately.
Here is my plan for my finished design:

Sew the strips altogether, lengthwise, right sides together, taking great care to maintain the 5cm seam allowance.


We are making a chequerboard block. I have chosen to use 4 fabrics - you could use just 2 or 6! The layout of your individual squares is up to you. Here is the plan I made:

This represents my four fabrics, cut into 6 strips 7cm x 42cm.

Here is my plan for my finished design:


Press the seam allowances to one side.

(You can see that I had to join some of my strips)
Cut this block into 6 strips, 7cm wide, at right angles to your stitching.

Turn every other strip around, so that you achieve your design.

Sew these strips together, right sides together. Pin each seam very carefully so that the seams align. (As you did when making the pin cushion)


Sew very carefully, leaving a 5cm, even, seam allowance.


Now your second block is ready to be quilted!
Plenty of craft activity going on....
Look at these gorgeous cards and a bunny! All made by Beryl! Wow!


This one is a rain shaker card.


These are hot foil cards

This one is for the bridegroom

A hot foil card

Christmas gift tags (this is planning ahead!)

This cute little bunny is for Grayson, Beryl’s great grandson! He is a lucky chap!

Sunday, 22 March 2020
We can do other crafts, too....
One of our members, Sue, enjoys knitting, and always has a project on the go. Here is her latest Easter bonnet creation. Modelled fairly willingly (?) by Skipper.( He is concerned about his street cred, so please don’t let any dogs view this post.)


Patchwork Post - small cushion 3 - reflecting on previous work
This morning I have been considering my efforts yesterday!
Take a look at the photo of the finished block - you will see that one of the large owls outlined is a pretty good shape (possibly improved if I had used a different colour thread?) but the second one looks as if he has fallen from the tree in the Hundred Acre Wood, during the storm.
So! To remedy this I shall make an appliqué patch to cover his offset face! This occurred because, following the success of the first owl, I didn’t bother to tack the template into position before sewing, and the inevitable happened! Yes, it moved and I have a wonky owl. Unpicking is an option, but tricky because the holes remain even though the thread is removed. Moral of the story- always tack or carefully pin stuff in place!
I’m thinking of making this a story cushion, as I happen to have used some owl fabric. Either from Winnie the Pooh or The Owl and the Pussycat. If I didn’t want to make the cushion, it could be one block as part of a quilt - with other parts of the same story represented, or other stories. That would make a great quilt for a story loving child! (Or adult, come to that!)


Using a zigzag stitch, altered on the machine so that the zigzags are very close together, I have sewn my owl shaped patch over the wonky owl!
Saturday, 21 March 2020
Crafts
Lately I have been posting lots of sewing - are any of you doing and making other things? Can we have a spot of variety? Please send me photos of what you have been doing, for interest and inspiration to the rest of us!
Incidentally, have you clicked on the “Christmas Party Larks” on the left side of this blog page? 🤣🥳👏
Incidentally, have you clicked on the “Christmas Party Larks” on the left side of this blog page? 🤣🥳👏
And another simply fabulous PP!


Patchwork Post - small cushion 2
Now for the quilting. First choose your wadding - I have some polyester wadding which is quite bouncy and gives a very textured finish. Equally good for a cushion is either some fleece fabric or an old jumper.
First make up a practice sandwich using some spare fabric, then your chosen wadding and a piece of fabric to back it. This will not be seen once the cushion is finished. I have used an old duvet cover.


First make up a practice sandwich using some spare fabric, then your chosen wadding and a piece of fabric to back it. This will not be seen once the cushion is finished. I have used an old duvet cover.

Below the blue fabric is the fleece and the red an old jumper.

Pin and tack the sandwiches together - or use safety pins to hold all three layers together so that they don’t slip. (You can buy special quilting safety pins which are curved and easier to insert and remove)

Now you are ready to quilt.
First remove the presser foot from your machine, and use a darning foot if you have one. If not, be very careful and use the bare needle. Be sure to keep your fingers well away from the needle.
Next, lower the feed dogs - the zigzag sections which push the fabric along underneath the needle- you are going to do the pushing, so you don’t need them.
Below you can see my darning foot and the feed dogs are raised.

Here they are, lowered.

Now put your fabric under the foot, lower it (you will have to lower the lever even if you aren’t using a foot!) Lower the needle into the fabric and guide the fabric around one of the shapes on your fabric - I have sewn around the owls here.

Use the practice pieces to get the hang of it. You may find it easier to control the fabric if you wear a rubber glove or a (clean!) gardening glove which has grips on the fingers. I cut the fingers off!

You can see from the photo that the fleece and old jumper linings are equally effective to give some texture.

Then I drew a larger owl to use as a template for the plain sections of my block. The outline can be drawn on to the fabric, especially if you have a special fabric pen, whose ink is water, air or heat soluble.


I could also embroider on to my large owls....
this is the block for the front of my cushion.

Subscribe to:
Posts (Atom)